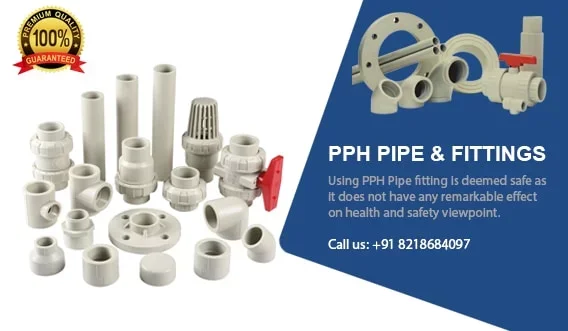
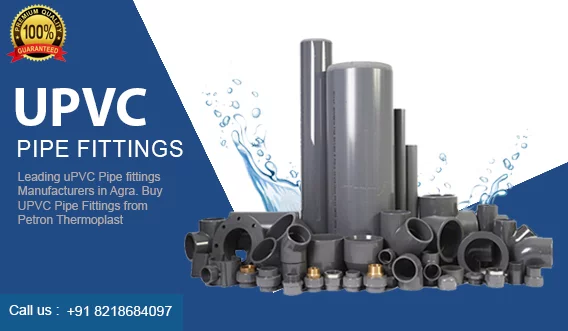
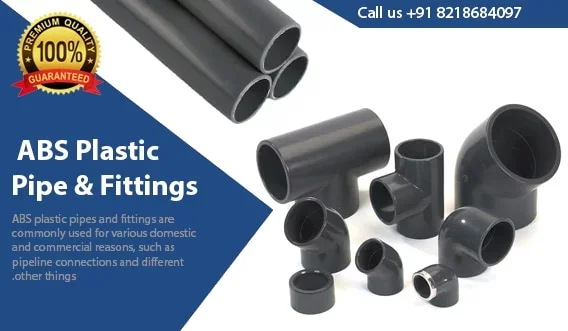
You are currently viewing How to Avoid Sink Marks in Injection Molding

How to Avoid Sink Marks in Injection Molding

Sink marks are one of the most common cosmetic defects in injection molded parts. These small depressions or dimples typically appear on the surface of plastic components, especially in thicker areas. While they might not always affect part functionality, sink marks can compromise the appearance, quality, and sometimes even the structural integrity of your molded product.

In this guide, we’ll explore what causes Sink Marks in Injection Molding, and—more importantly—how you can avoid them through smart part design, mold design, and process control.

What Are Sink Marks?

Sink marks are small, recessed spots that usually appear on the surface of thick plastic sections. They occur when the inner part of the plastic cools and shrinks more than the surface, pulling the surface inward.

These defects are especially common in:

  • Thick sections of molded parts
  • Areas behind ribs or bosses
  • Locations where plastic flow converges
  • Parts made from semi-crystalline polymers

The good news is that sink marks are largely preventable with the right techniques.

Common Causes of Sink Marks in Injection Molding


Sink marks are surface depressions that appear on injection-molded plastic parts, usually in thicker sections where material shrinks more as it cools. These imperfections can affect the appearance, functionality, and structural integrity of the finished product.

Sink Marks in Injection Molding

Here are some of the most common causes of sink marks in injection molding:

Insufficient Packing Pressure

During the packing stage, molten plastic is pushed into the mold to compensate for shrinkage. If the pressure is too low or the packing time is too short, there won’t be enough material to fill in the shrinkage, leading to sinks.

Low Mold Temperature

A mold that’s too cold can cause the outer surface to solidify too quickly, trapping the inner material before it can properly fill out the cavity and compensate for shrinkage.

Improper Gate Location

If the gate (where plastic enters the mold) is placed far from thicker sections, those areas might not be adequately filled or packed, leading to sinks.

Material Shrinkage Characteristics

Some thermoplastics naturally shrink more than others. Materials like polypropylene and polyethylene are more likely to develop sink marks due to their high shrinkage rates.

Inadequate Cooling Time

Removing the part from the mold before it has cooled sufficiently can result in post-ejection shrinkage, which often manifests as sink marks.

Poor Venting

Inadequate air venting can cause trapped air that prevents the molten plastic from completely filling the mold cavity, increasing the chance of defects including sink marks.

How to Prevent Sink Marks in Injection Molding

Now that we know the causes, let’s go through actionable steps you can take to prevent sink marks.

1. Design for Uniform Wall Thickness

One of the most effective ways to prevent sink marks is to maintain a consistent wall thickness throughout the part. Avoid abrupt transitions and thick sections whenever possible.

Tips:

  • Use coring to hollow out thick areas.
  • Design ribs and bosses to be 60–80% of the surrounding wall thickness to minimize shrinkage.
  • Use gradual transitions between thick and thin areas.

2. Optimize Gate Design and Placement

Gate location and type directly affect how plastic flows and fills the mold.

Best Practices:

  • Place gates as close as possible to thick sections.
  • Use larger gates to allow longer packing time.
  • Consider using multiple gates for large parts to ensure even pressure distribution.

3. Control Packing Pressure and Time

The packing phase compensates for material shrinkage. If this step is cut short, the part is likely to experience sink marks.

Best Practices:

  • Increase the packing pressure and hold time until the gate solidifies.
  • Monitor the gate freeze-off time to ensure sufficient packing duration.
  • Avoid over-packing, which can cause flash or warp.

4. Enhance Mold Cooling System

Proper cooling is crucial to achieve uniform solidification across the part.

Tips:

  • Use conformal cooling to match complex part geometries.
  • Position cooling channels close to thick sections.
  • Maintain uniform mold temperature with efficient thermal control systems.

5. Select Low-Shrinkage Materials

The choice of plastic can have a major impact on the likelihood of sink marks. Amorphous plastics (like ABS, PC, or PMMA) generally have lower shrinkage than semi-crystalline plastics (like POM or PA).

Material Considerations:

  • If aesthetics are a top priority, opt for materials with low shrinkage.
  • Add fillers like glass fiber to reduce shrinkage and improve rigidity.
  • Work with material suppliers to find the best match for your part’s geometry and performance needs.

6. Use Mold Flow Simulation

Before building the mold, run a mold flow analysis to simulate how the plastic will behave inside the cavity. This helps identify high-risk areas for sink marks and provides guidance on:

  • Gate placement
  • Cooling system design
  • Pressure and temperature settings
  • Part geometry modifications

7. Adjust Processing Parameters

Fine-tuning your injection molding process can dramatically reduce or eliminate sink marks.

Key Parameters to Adjust:

  • Injection speed: Slower speeds can allow better packing in thick areas.
  • Melt temperature: Lowering the melt temperature can reduce shrinkage, but avoid going too low to prevent flow issues.
  • Mold temperature: Keeping this consistent ensures uniform cooling.
  • Back pressure: Increases material homogeneity and improves surface finish.

Need Help with Injection Molding Design?


If you’re struggling with sink marks or other molding defects, our engineering team can help. We offer custom plastic injection molding designs consultation, mold flow analysis, and full injection molding services to ensure your parts meet both performance and aesthetic standards.

Conclusion

Sink Marks in Injection Molding isn’t magic—it’s smart planning. From design to cooling to pressure settings, every step counts. petronthermoplast By following these tips, you can keep your molded parts smooth, professional-looking, and ready for action.

Frequently Asked Questions

What are the main causes of sink marks in injection molding?

The biggest causes are thick sections of plastic, uneven cooling, and low hold pressure during the molding process.

Can sink marks be repaired after molding?

While you can use polishing or filling techniques to mask them, the best solution is to prevent them during the design and molding stages.

Do all plastics show sink marks the same way?

No, some plastics like polypropylene shrink more and are more prone to sink marks. Material choice is a big factor.

How do I design to avoid sink marks?

Keep wall thickness even, avoid over-thick areas, and use coring to reduce material buildup. Also, rib and boss design matters.

What’s the best way to test if my design will have sink marks?

Use simulation software to model the injection molding process and identify risk areas before mold creation.