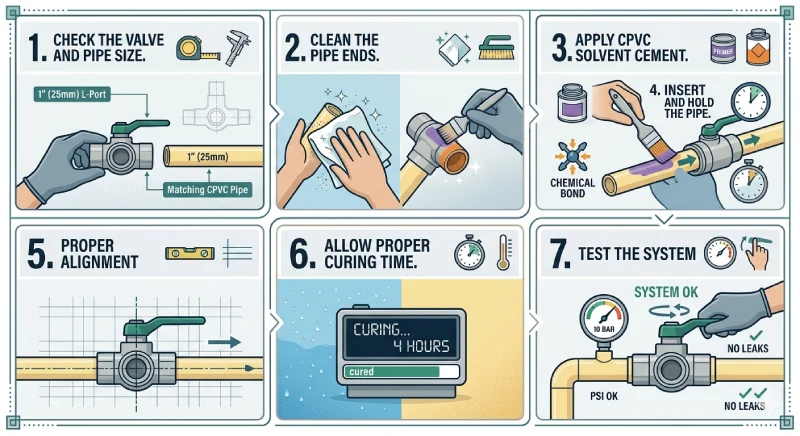
What is CPVC Valves?

CPVC Valves are controlling the flow of water and other liquids with ease. Chlorinated Poly Vinyl Chloride (CPVC) refers to CPVC Valves polymers that are manufactured from a CPVC layer.

These pipes and fittings are produced from high-quality raw materials and cutting-edge technology, making them appropriate for both cold and hot water distribution systems CPVC valves, a type of quarter-turn valve commonly used in industrial applications, rely on a simple mechanism to provide the operator with the best CPVC Valves Manufacturer in India.

Uses of CPVC Valves

CPVC Valve and CPVC Pipe and Fittings are a type of flexible thermoplastic piping and fittings used in residential and commercial plumbing. CPVC is also a member of this thermoplastic family.

It is a thermoplastic that is produced by chlorinating PVC resin. It has a lot more elasticity than ordinary PVC and can withstand a lot more. Examples of applications include hot and cold water delivery pipes, as well as commercial liquids management. Like PVC, CPVC is thought to be safe for carrying and utilising clean drinking water.

Best Used In CPVC Valves & CPVC Pipes

CPVC pipes have a unique combination of high shock resistance, pressure holding capacity/tensile stress, and a low Vicat softening point. These features decrease the danger of damage during transit, storage, and assembly, making them appropriate for a variety of applications.

  • Water, both hot and cold, for domestic and commercial usage.
  • Transfer of drinking water.
  • Chemical solvents to be utilised in industry.

Advantages of CPVC Valves

  • Long-lasting – Under ideal conditions, CPVC Valves & Pipe Fittings are expected to survive for up to fifty years. Due to extensive testing, CPVC Pipes and Fittings have long-term physical stability and durability.
  • Easy to install and use – CPVC Valve and Pipe Fittings are simple to put together. Because no power or heating is required, assembly is inexpensive.
  • Integrated Security: A solution cement-bonded connection is the most difficult part of the CPVC Pipes and Fittings system. Pipes and CPVC fittings are connected with a simple solution cement bonding technique that is considerably safer than other methods of assembly.

Applications of CPVC Valves and Pipes

  • Hot and cold water transportation in residential, commercial, and governmental projects.
  • Liquids, such as drinkable water and meals, must be transported.
  • Drinking water and sewage water cleaning facilities
  • Transportation of hazardous and caustic fluids, which includes a variety of inorganic acids and bases utilised in chemical processes.

Solvent Welding

INSTRUCTIONS

Solvent welding, or cement jointing, is the longitudinal joining system for connecting rigid PVC-U pipes and fittings. The “cementing” is carried out using adhesives/cements obtained by dissolving PVC-U polymer in a solvent mixture. This solvent liquefies the walls of the pipe and/or fitting, allowing the constituent material to chemically combine and be subse-quently welded. Chemical welding allows permanent joints be achieved possessing

chemical and mechanical strength characteristics identical to those of the pipes and fittings joined. The adhesives/solvent cements must be selected according to the type of thermoplastic resin to weld, in that the nature of the solvents vary, as does
the weld material contained in them. It must be remembered, therefore, that all the solvent cements designed for joining thermoplastic pipes and fittings must be used to join pipes, fittings and valves of the same material.
Before starting any solvent welding operations, the efficiency and condition of the equipment used and the pieces to be assembled must be verified, in particular the uniformity, fluidity and expiry date of the solvent cement.

1. Fig 1

Cut the pipe perpendicular to its axis to obtain a clean square section, preferably using a wheeled pipe cutter designed specifically for thermoplastic pipes (fig. 1).

2. Fig 2

Chamfer the outer edges of the pipe in order to ensure that it enters the socket of the fitting at an angle of 15°. The chamfering operation must be carried out at all costs, otherwise the lack of chamfer can lead to the solvent being scraped off the surface of the fitting, thus compromising the effectiveness of the joint. The chamfering must be carried out using the appropriate chamfering tool (fig. 2).

3. Fig 3

Measure the depth of the socket of the fitting to the internal shoulder and mark the corresponding distance on the end of the pipe (fig. 3 and 4). For more de- tails, refer to the “Socket depth, cement and chamfer length” table.

4. Fig 4

Using an clean paper towel or applicator soaked in Cleaner-Primer, remove any traces of dirt or grease from the outer surface of the pipe for the entire cement-ing length. Repeat the same operation on the internal surface of the socket of the fitting: leaving the surfaces softened (fig. 5).
Leave the surfaces to dry for a few minutes before applying the solvent cement. Remember that, in addition to cleaning the joint surfaces, the Cleaner-Primer also performs the important role of softening and preparing the surface to receive the solvent, an operation that enables a perfect joint to be obtained

5. Fig 5

Apply the solvent cement in a uniform manner longitudinally over both parts to be assembled (outer surface of the pipe and internal coupling surface of the fit-ting) using an applicator or suitably sized coarse brush.

For more detailed information, refer to the “Brush-applicator characteristics and dimensions” table. It is advisable to use an applicator/brush of dimension not less than half the di-ameter of the pipe. The solvent cement must be applied along the entire length

of the joining surface of both the pipe and the fitting:
– for the entire joint length of the pipe previously marked on the outer surface
(fig. 6)
– for the entire depth of the socket as far as the internal shoulder (fig.7)

6. Fig 6

Fully insert the pipe into the fitting immediately and without any rotation. Only after this operation will it be possible to slightly rotate both ends (max. 1/4 of a turn between pipe and fitting). This rotation movement will render the layer of applied solvent cement more uniform (fig. 8)

7. Fig 7

The pipe must be inserted in the fitting as soon and as quick as possible (after no more than 20-25 seconds is recommended). Depending on the external diameter of the pipe and, as a result, possible handling difficulties, the insertion of the pipe
into the fitting must be carried out:
– manually by one person for external diameters < 90 mm.
– manually by two people for external diameters from d 90 to d < 160 mm. – using mechanical pipe-pullers for external diameters > 160 mm.

8. Fig 8

Immediately after fully inserting the pipe in the fitting, apply pressure to the joined parts for a few seconds. Then use crepe paper or a clean cloth to remove any excess solvent cement from the outer surfaces, and from internal surfaces where possible (fig. 9).

9. Fig 9

Solvent cement drying: the joined parts must be left to stand in order to allow the solvent cement to set naturally without generating any unnecessary stress. The setting time depends on the amount of stress that the joint will be placed under.
In particular, the following minimum setting times must be respected according
to the ambient temperature:
• before handling the joint:
– from 5 to 10 minutes for ambient T. > 10°C
– from 15 to 20 minutes for ambient T. < 10°C
• for repair joints on pipes of any size or pressure not subject to hydraulic testing:
– 1 hour for each atm of applied pressure
• for joints in pipes and fittings of any diameter subject to pressure testing up to
PN 16:
– minimum 24 hours
The solvent cement setting times indicated are valid at ambient temperature
(approx. 25°C.). For particular climatic conditions (humidity, temperature, etc…),
we recommend you contact our technical services department and/or the solvent
cement manufacturer for more information (fig. 10 and 11).

10. Fig 10

11. Fig 11

CPVC Pipe & Fittings

GET THE LATEST CPVC Valves PRICES ON YOUR EMAIL